Single GPU Passthrough
credit to: https://gitlab.com/risingprismtv/single-gpu-passthrough/-/wikis/home
Is this worth it? I don't play games like Valorent or anything as such, we can hide the fact that we are using a VM.
Steam's Proton and Linux Wine Tricks etc has come so far that you should try to get it working in Linux first, Lutris etc, heroic games launcher.
Prereq:
- X11 (I cannot get Wayland to work)
- Linux host installed and booted via UEFI mode
- Virtualization enabled in the BIOS (look for VT-D/VT-X, IOMMU, etc)
If you use Garuda or a BTRFS COW copy on write file system you may need to modify the dir it works in.
Going to assume you have already used Virtual Box or VMware and if you had any systems booted/working in a virtual machine, then you should be good to go.
To set X11 as default:
sudo mousepad /etc/sddm.conf

change: Session=plasma
to
Session=plasmax11.desktop
GRUB:
sudo mousepad /etc/default/grub

#-------EDIT/ADD--------#

GRUB_CMDLINE_LINUX_DEFAULT='quiet loglevel=3 amd_iommu=on iommu=pt video=efifb:off nvidia_drm.modeset=1'


sudo grub-mkconfig -o /boot/grub/grub.cfg
for intel cpu just change to: intel_iommu=on
Also you may want to remove the quiet option if you run into issues and need more logs.
the “nvidia_drm.modeset=1” is only for nvidia GPU if the VM does not boot but nvidia users should add it. AMD do not add
LIBVIRT:
Install packages: Choose your distro
# Arch
sudo pacman -S virt-manager qemu vde2 ebtables iptables-nft nftables dnsmasq bridge-utils ovmf

# Debian
sudo apt install qemu-system-x86 libvirt-clients libvirt-daemon-system libvirt-daemon-config-network bridge-utils virt-manager ovmf
Remove the # comment (un-comment these 2 lines in libvirtd.conf)
sudo mousepad /etc/libvirt/libvirtd.conf

unix_sock_group = "libvirt"
unix_sock_rw_perms = "0770"
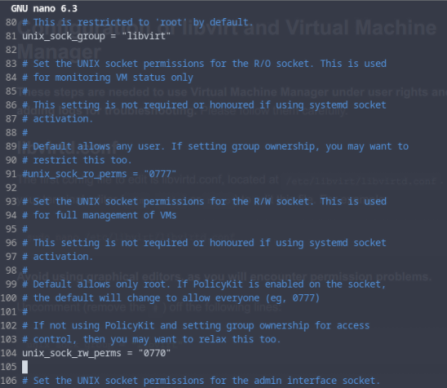
log_filters="3:qemu 1:libvirt"
log_outputs="2:file:/var/log/libvirt/libvirtd.log"
^ Example of libvirt.conf ^ ^ Also in libvirt.conf: add these 2 lines at the bottom of the file ^
Add user to group:
sudo usermod -a -G kvm,libvirt $(whoami)
sudo systemctl enable libvirtd
sudo systemctl start libvirtd
QEMU:
Uncomment and edit these two lines in qemu.conf
user = "root"
group = "root"

# Replace root with your username

sudo mousepad /etc/libvirt/qemu.conf
sudo systemctl restart libvirtd
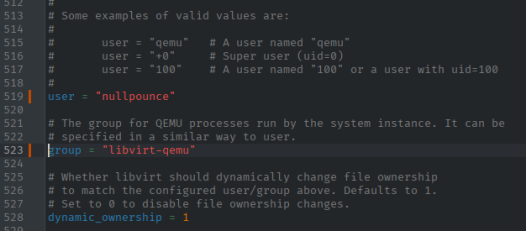
group should idealy be changed to “libvirt-qemu” (dynamic ownership is optional, works for me)
ENABLE VIRTUAL MACHINE DEFAULT NETWORK:
2 options
# Auto start on boot (recomended)
sudo virsh net-autostart default

# Manual (this command must be ran before every VM boot)
sudo virsh net-start default
2. Patching The GPU
For your VM to properly work with your GPU, it needs to have access to its ROM (also called vBIOS). This is mostly true for NVidia cards,
and some AMD cards. In this step you have multiple options to dump your card ROM. You can also download your ROM from TechPoweredUp,
but this is extremely unrecommended and will not be covered here.
Dumping your ROM is only necessary for NVidia cards, you can still dump your AMD card ROM, but it is not needed in most cases.
DUMPING THE ROM
if you have access to windows you can easily dump the GPU ROM this way
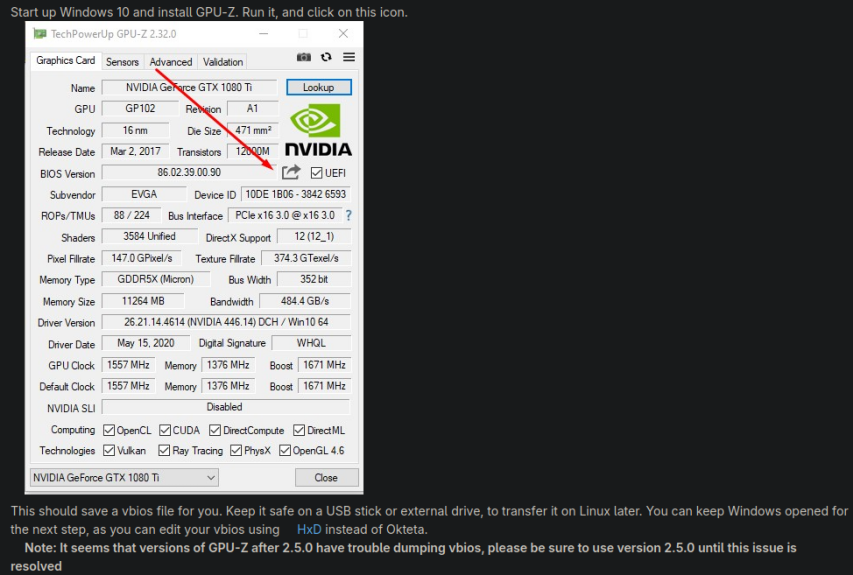
if not then you can use hirens boot cd PE

Patching your dumped ROM
Patching your ROM is very easy. This operation is not necessary with AMD ROMs. You will need an hex editor like Okteta on Linux, or, if you are still on windows, HxD. Open a copy of your rom file, keeping the original somewhere safe, in the editor of your choice. Press Ctrl + F to access the search function, and search for VIDEO, on the Char setting:
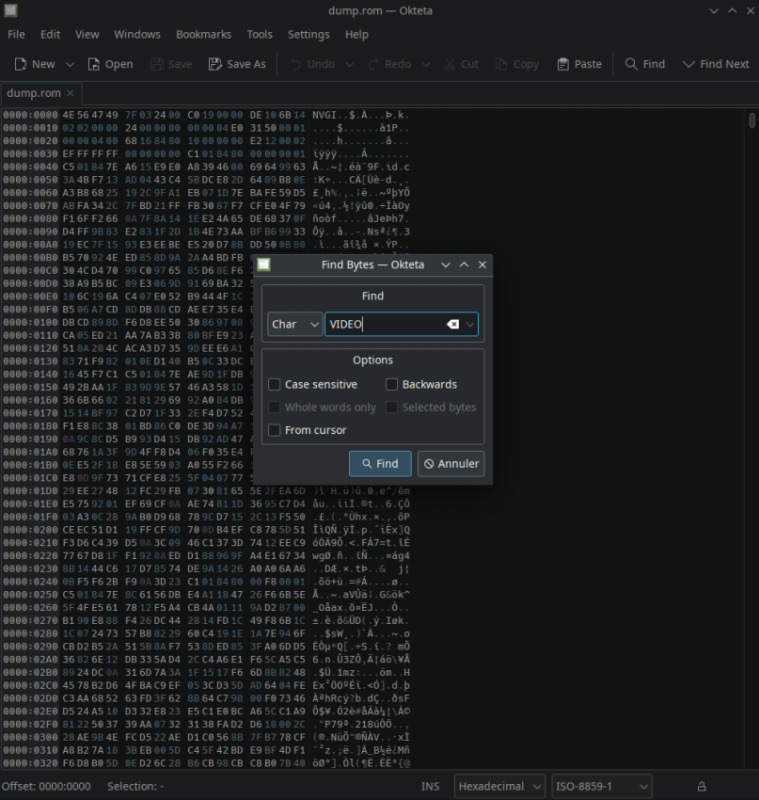
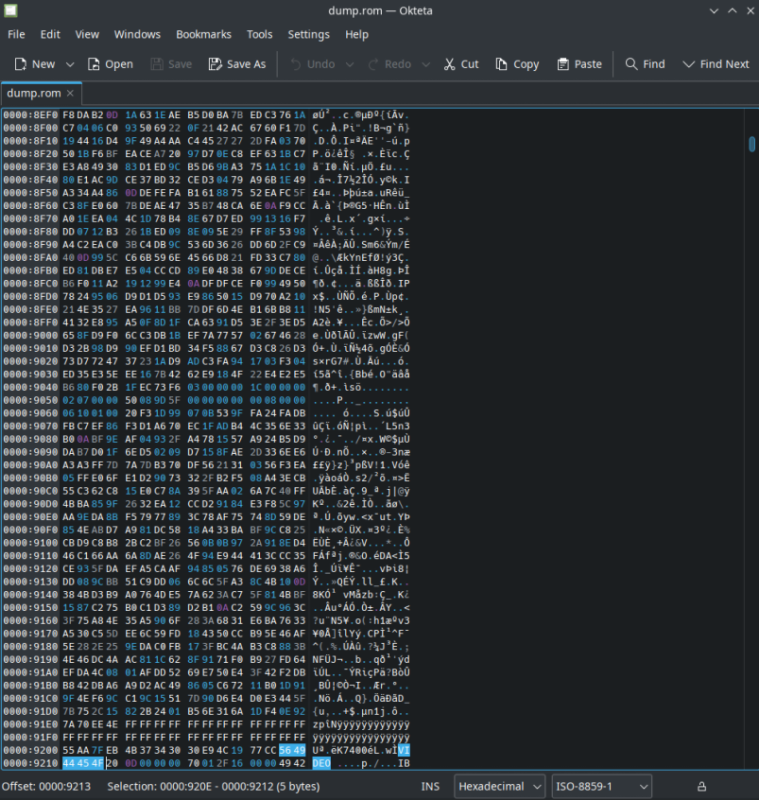
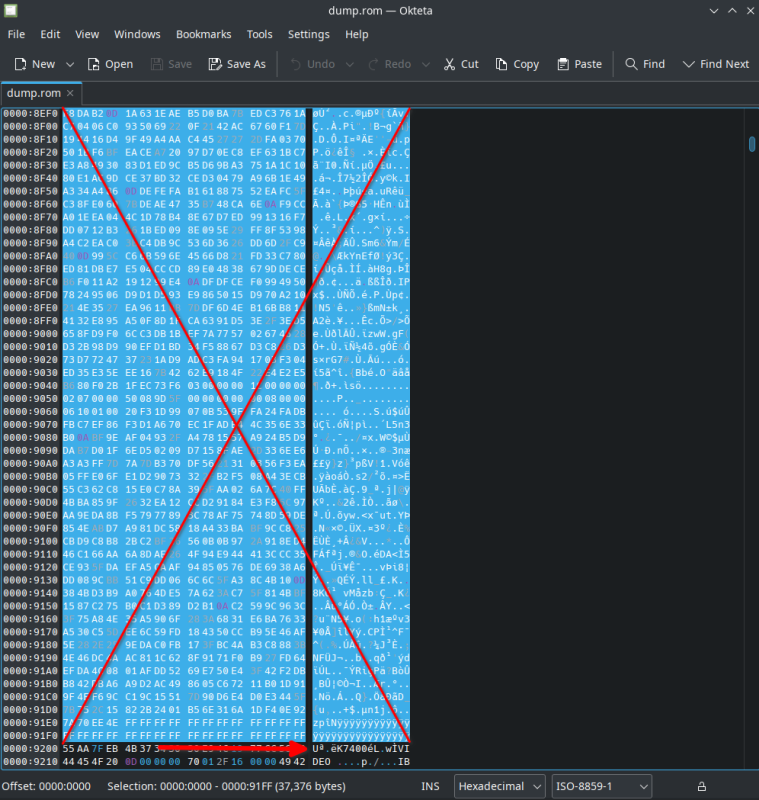
Now, place your cursor before the first U before the VIDEO we just searched, like this, and select everything before it: (pic on the right)
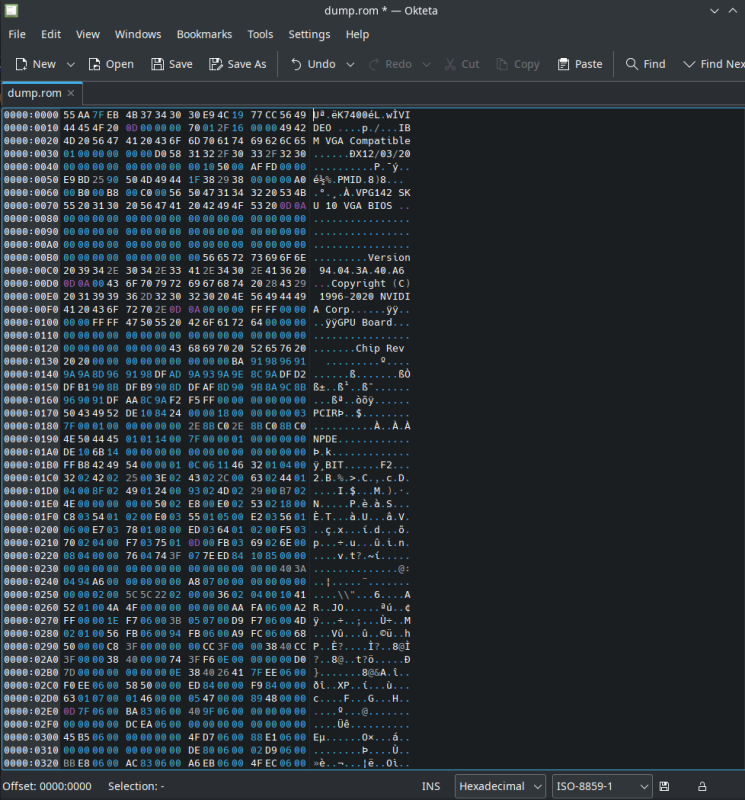
When everything before U is selected, press your DEL key, and delete your selection. If it isn't working in Okteta, switch the edit mode by pressing your INSER key or by switching mode in the bar at the bottom of Okteta's window (INS or OVR mode). You should end up with a result similar to this one:
 |
| 
should look something like this example on the right
Save the file under a different name, like patched.rom. Your ROM is now patched and can be used!
PLACING YOUR ROM
Create a folder called vgabios in /usr/share/
sudo mkdir /usr/share/vgabios
Place your patched ROM in the newly created directory, and sets its permissions:
cp ./patched.rom /usr/share/vgabios/
cd /usr/share/vgabios
sudo chmod -R 644 patched.rom
sudo chown yourusername:yourusername patched.rom
3. VM Setup & Windows Install
VIRTUAL MACHINE MANAGER
Download your windows ISO and VirtIO drivers ISO.
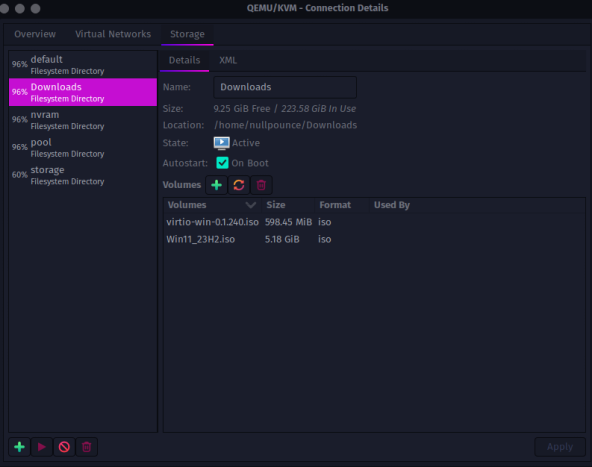
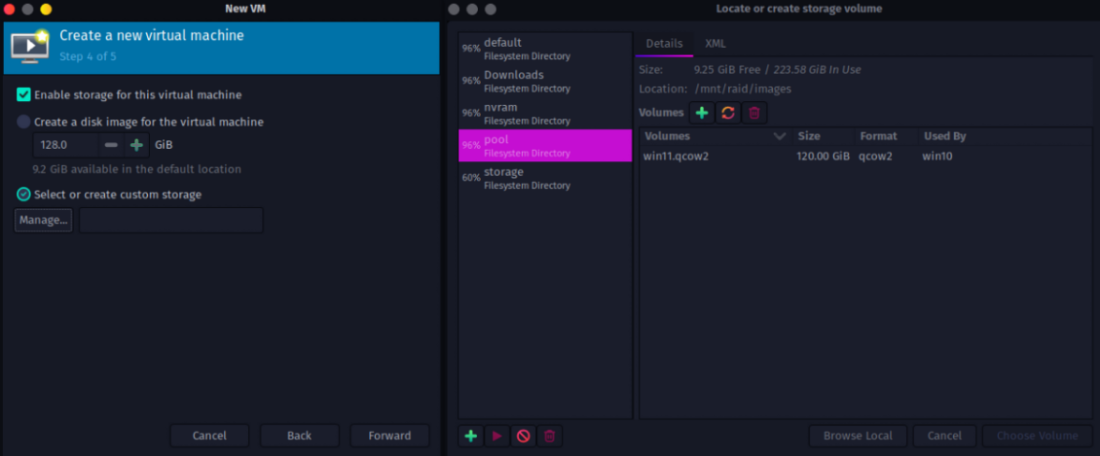
Inside Virt-Manager click on edit connections and click on the green plus to add a new storage pool
file system directory. Add the location of these 2 ISO's like so:
Link To: VirtIO ISO Drivers
My Video Guide Series On Getting A Legit Windows 11 Enterprise ISO With TPM Bypass (also covers activation, debloating, custom boot logo, Installing in VMware)
Link To: TPM Bypass Toggle Script (just drag and drop any Windows ISO onto the .bat file to remove the TPM requirement
You need at least WIndows Pro version for required features and Enterprise is the only version that “Allows” Turning of required data tracking telemetry. Off topic but pro
and enterprize versions do not offer better performance, it's worse untill you turn off corpo and file sharing services etc, uses more ram before a de-bloat.
NOTE: I do not reccomend you place the VM Image on a 7200 RPM mechanical HDD, store this 50GB qcow2 file on a SSD or NVme.
VM IMAGE
You can click the green plus and make a new VM now or make the Image/volume for the VM in here now instead since were already here.
Create a storage pool filesystem directory on the drive/dir you want to store the image and create a qcow2 image min 45-50 Gigabytes
Create a new VM and select your Windows ISO.
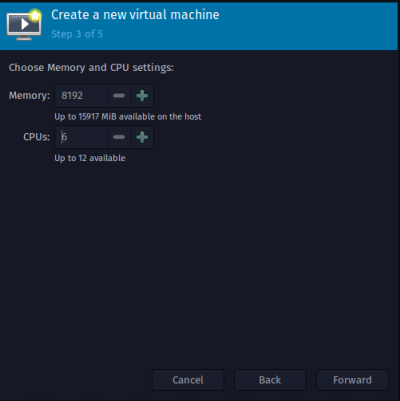
| Only do half your ram, keep it binary, ex 1024 X 8 = 8192
I have 6 cores, not 12, passing all. choose customize install

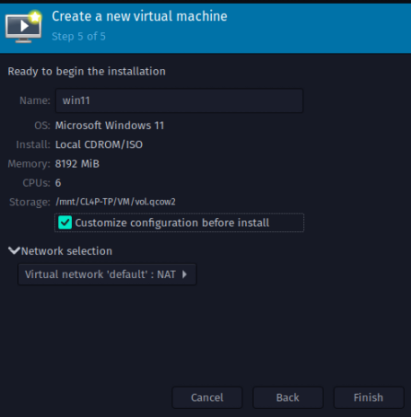
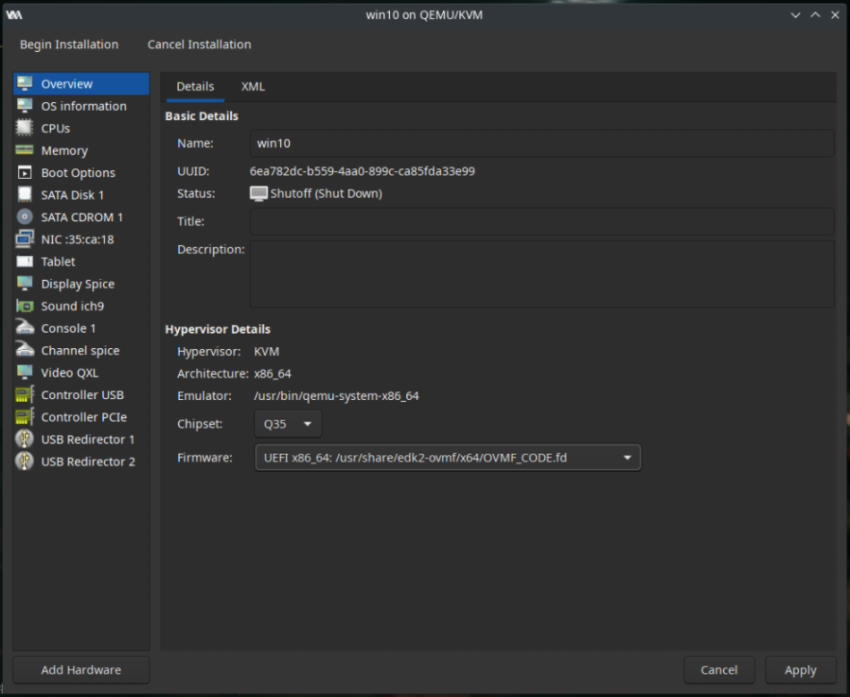
make sure chipset and firmware are set to:
# Chipset:
Q35

# Firmware:

# Arch
/usr/share/edk2-ovmf/x64/OVMF_CODE.fd

# Debian
/usr/share/OVMF/OVMF_CODE_4M.fd
If you did not do the TPM bypass then you need the version with .secboot
CPU Tab:
check manually set CPU topology
sockets = 1
cores = 6 (how many cores you want to pass)
threads = 2
VirtIO Disk 1 TAB:
Disk Bus: VirtIO
Cache Mode: Writeback
Discard Mode: unmap
Booot Options TAB:
Enable CD-ROM and change it to the first boot entry
Next click on add hardware, add a CD-ROM device and choose the VirtIO ISO as it's storage
lastly on the NIC TAB just make sure it's set to virtual network default NAT
(if you cannot boot then try removing the NIC device)
Click on begin install ( it may take a while)
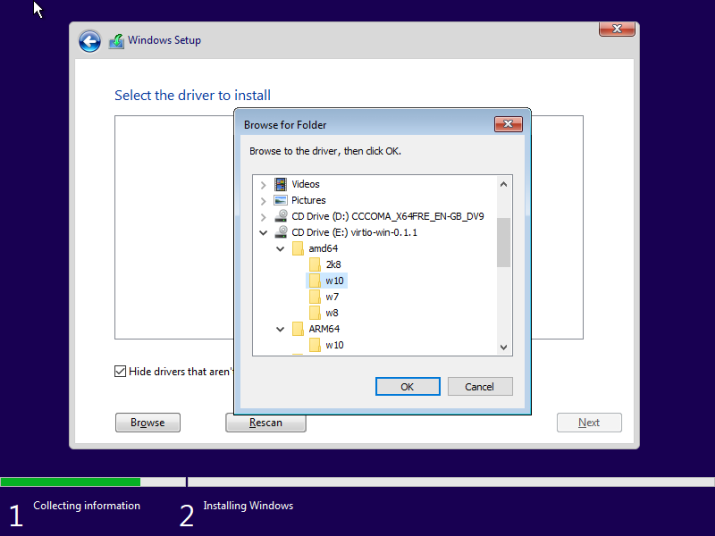
Click load driver and navigate to the VirtIO CD-ROM drivers to detect the virtual hard disk
After a reboot open a cmd with Shift + F10 and type:
ipconfig/release

# if that does not work then do:

OOBE\BYPASSNRO

# it will reboot then you can release the ip and disable the internet and
# install with limited setup for a local account.
when it says hi or wait send a ctrl + alt + del command then click sign out then sign back in to skip the loading
FUN TIP: Windows allows _ as a host name... yep just a underscore, nothing else, does wonders to logs...
At this point Windows should be installed, reboot to get internet working if you did the OOBE\BYPASSNRO.
This is the time to install updates and activate, download and install Latest virtio-win-guest-tools.exe (choose not to enable the balloon during install)
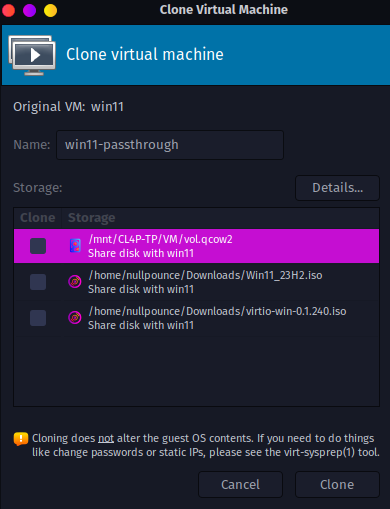
MAKE A CLONE
right click on the VM and clone it without the storage, name it something like passthrough.
Reason for this is to have a passthrough VM and another without (no extra data)
4. Modying For Passthrough
Open the VM that you made a clone of, remember we want a non passthrough copy.
ignore my win11 name and be sure to edit the passthrough/clone.
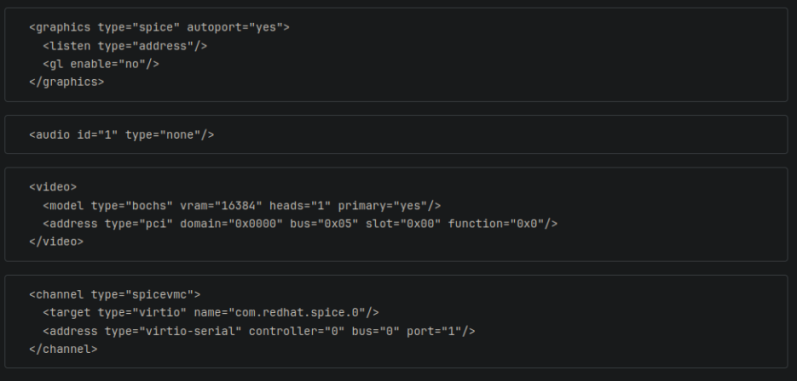
Remove all devices next to the green lines
for display spice and video qx you have to remove the usb redirectors first, if you have error then edit the xml in the overview tab and remove:
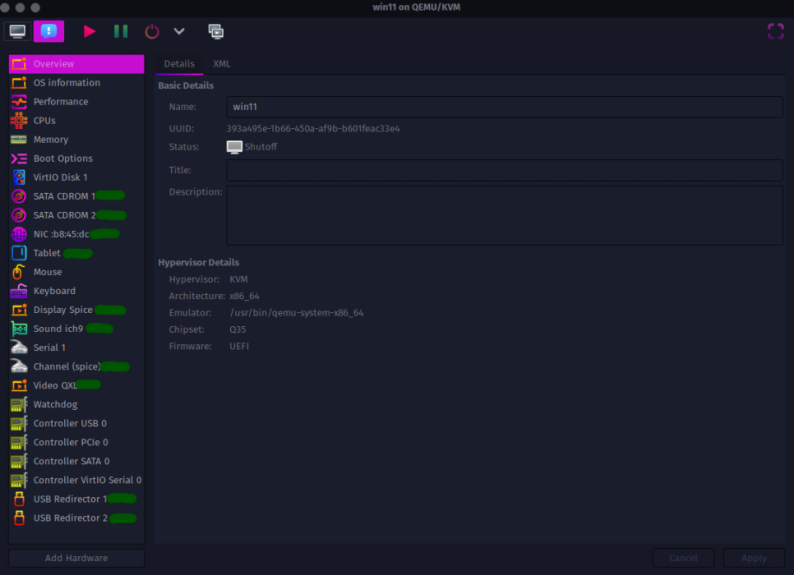
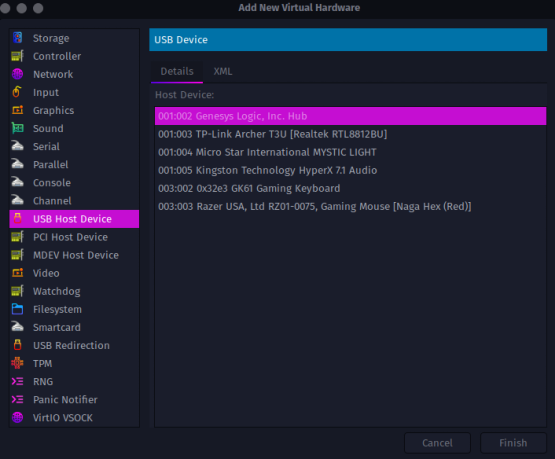
Add your keyboard and mouse via usb/ add device
IOMMU Groups
Your PCI devices are divided in groups, called IOMMU Groups. Your GPU is in one, or multiple of these groups,
and you need to pass to the VM the entirety of the group that contains your GPU.
Use this script to list all your groups (copy-paste it in your commandline):
#!/bin/bash
shopt -s nullglob
for g in /sys/kernel/iommu_groups/*; do
    echo "IOMMU Group ${g##*/}:"
    for d in $g/devices/*; do
        echo -e "\t$(lspci -nns ${d##*/})"
    done;
done;
You will get an output similar to this one:
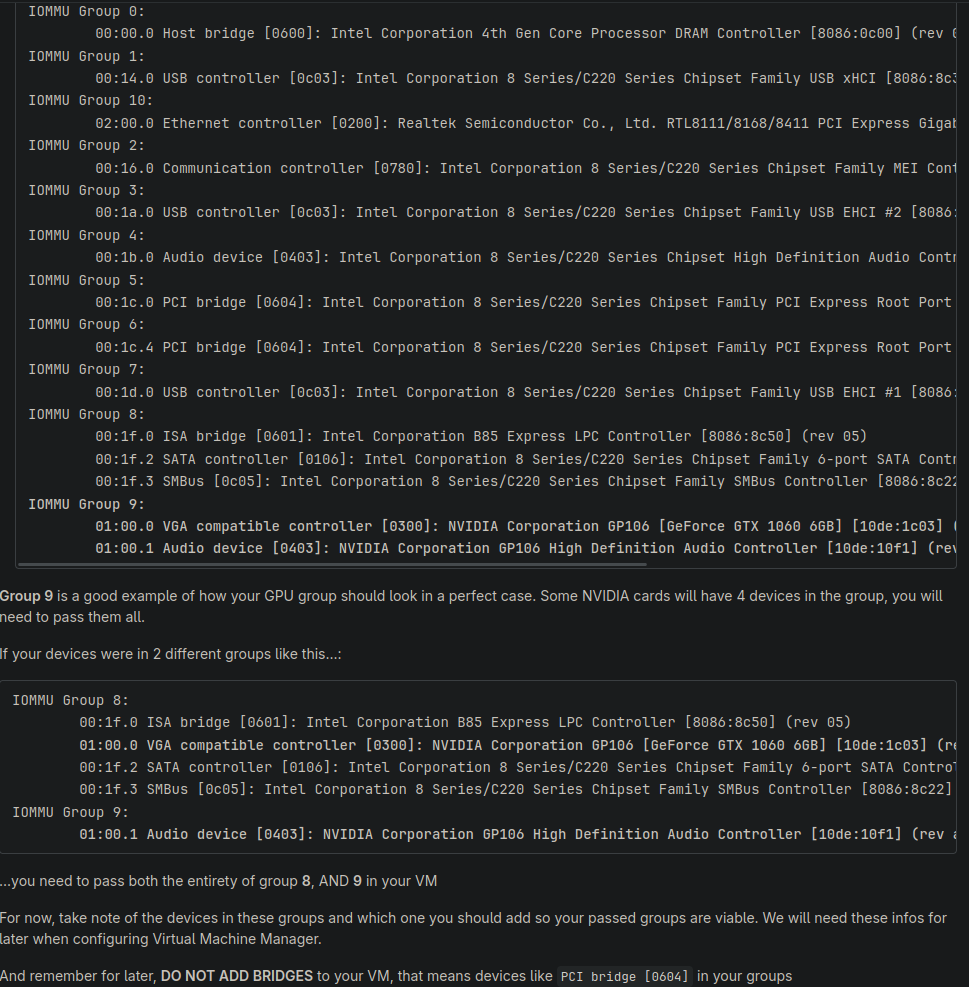
Now that we have located our GPU in it's pcie group it's time to add our GPU to the VM
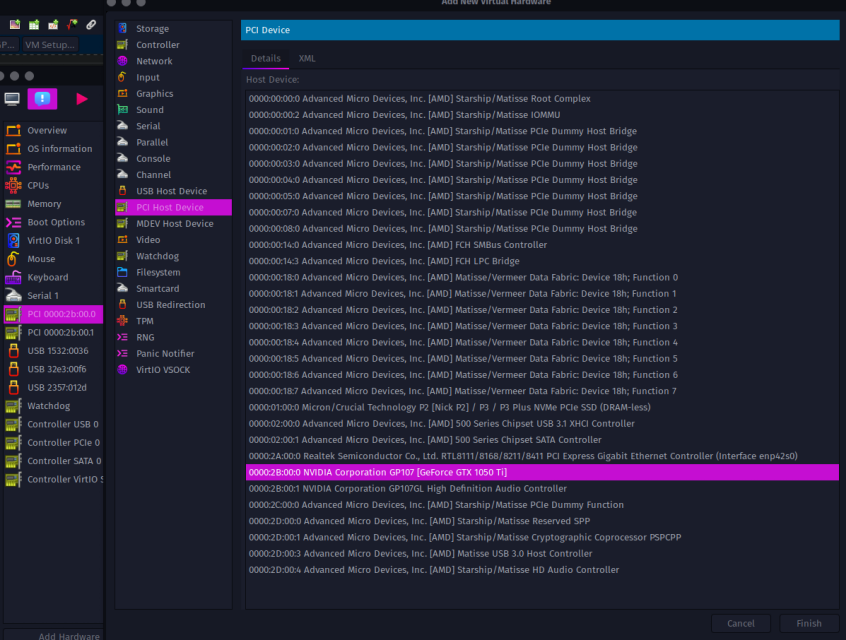
click on hardware then pcie devices, add every line that is your GPU, I only have 2 which is my audio and video.
remember to add other pcie devices in here if they are part of the same group the gpu is in etc
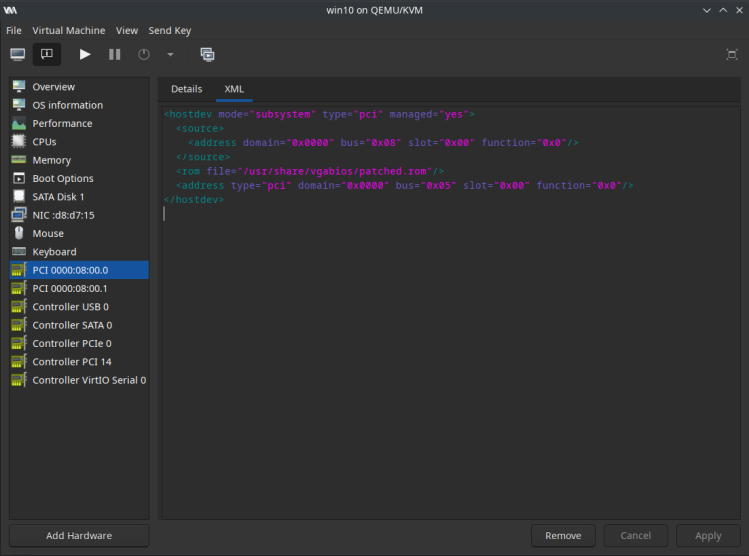
Go in the XML tab of your newly added GPU, and add the following line:
<rom file='/usr/share/vgabios/patched.rom'/>
should look like this when edited
remove the virtual nic, move on to scripts.
I am only able to pass through my front panel usb ports, I used a wifi usb adapter for networking
5. Scripts
scripts & logfiles
git clone https://gitlab.com/risingprismtv/single-gpu-passthrough.git
cd single-gpu-passthrough
sudo chmod +x install_hooks.sh
sudo ./install_hooks.sh
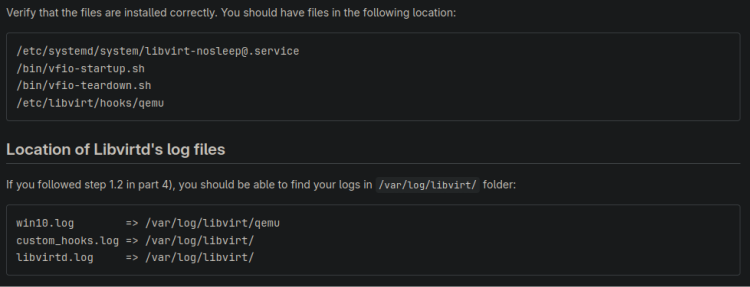
Make sure the qemu script has the correct VM name:
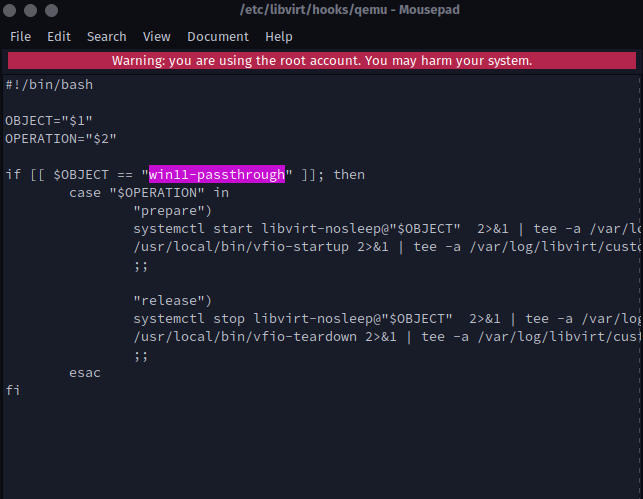
sudo mousepad /etc/libvirt/hooks/qemu
The default highlighted area in quotes is "win10"
as you can see I have changed it's name to “win11-passthrough” as this is the VM that needs to be hooked.
So just make sure what's in the quotes is the name of the VM with the pass through.
If you have any issues with startup you can edit vfio-startup script
systemctl --user -M username@ stop plasma
killall kwin_wayland
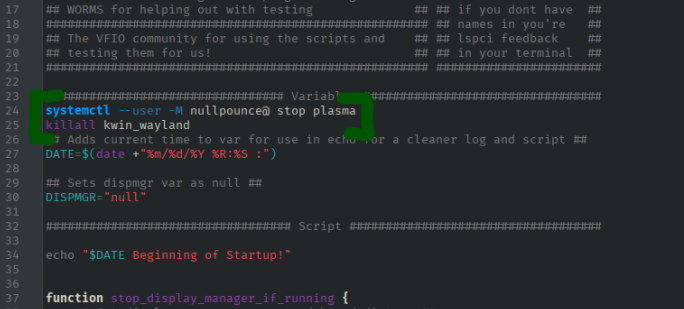
same file: (only edit if you have problems)
## Unload NVIDIA GPU drivers ##
    modprobe -r nvidia_uvm
    modprobe -r nvidia_drm
    modprobe -r nvidia_modeset
    modprobe -r nvidia
    modprobe -r i2c_nvidia_gpu
    pkill -9 x
    modprobe -r drm_kms_helper
    modprobe -r drm
you will find this at the bottom of the file, you can remove both lines with "drm"
you should add “pkill -9 x”
6. Storage
You should now be able to power on the passthrough VM and get a black screen for a moment then load into the windows VM,
Install your GPU drivers like normal and make sure the GPU shows up in the task manager.
STORAGE: SATA IMOU groups and luck
this will be short as if you've come this far then you understand well enough.
Best way is to add a hardware device and pass through your SATA controllor
You can only do this if the Linux host OS is installed on a non SATA device like a NVMe
as this will also pass through ALL connected SATA devices but offers the best perfomance.
I am unable todo this as my SATA bus is in the same group as my unsupported NIC so I cannot pass all the devices in.
STORAGE: What I do
Open Virtial Machine manager and create a new volume image.
make this a raw img not a qcow2 and also set the cache to none, (create this img where your games are)
for example you can have the games hard drive with all the games and use wine/ steam proton on linux and get alot working, then you
can create a img drive for storing games for windows, you cannot just add a file dir to the program.
you make a new image say just for one game ground branch 30 gigs, so make a new 35GB img and store it on the games drive.
next you have to add this image as hardware in the VM settings, if all went well you should be able to open up windows disk management and format the img to NTFS.
next power off the VM and add a usb device, we are going to add a usb hard drive with our games on it and copy them over.
you can also just use a larger image size for the OS and install/download steam games onto the C drive.
I have a 1tb hdd so i'll make a 320GB img for games that don't work in Linux and things like riskware etc.
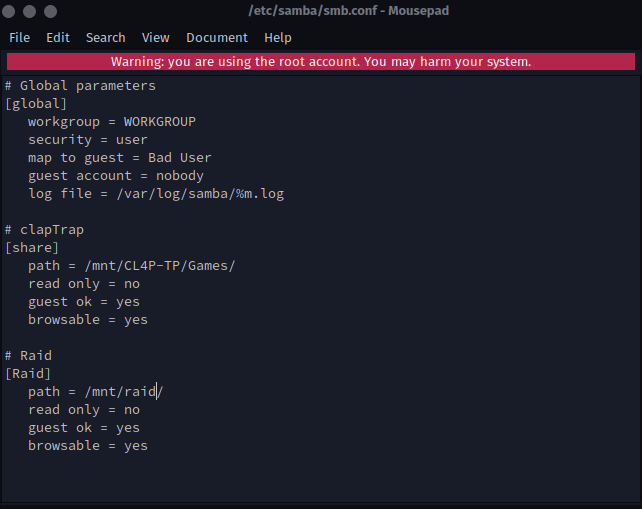
SAMBA:
sudo pacman -S samba
sudo mousepad /etc/samba/smb.conf
edit smb.conf to add drives (example)
set a password :
sudo smbpasswd -a YourUsername
sudo systemctl restart smb.service
check config:
type in terminal “testparm”
troubleshoot samba
smbstatus
sudo smbpasswd -a YourUsername
sudo systemctl start smb
sudo systemctl enable smb
sudo systemctl start nmb
sudo systemctl enable nmb
next open the file explorer in windows and type \\192.168.0.129\share
this method is not ideal and only okay for smaller games and files, ground branch takes 3 mins to load the main menu vs my way is 10-30 seconds with the img stores
Troubleshooting
troubleshooting: Failed to start libvirt legacy monolithic daemon and unable to connect to libvirt
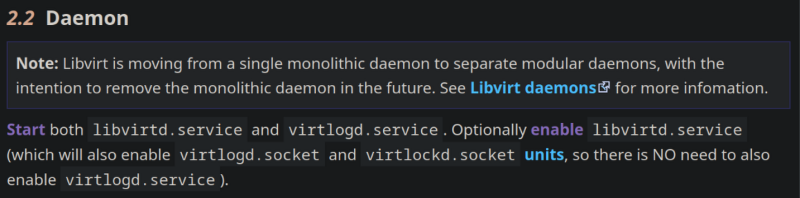
sudo systemctl restart libvirtd
systemctl enable virtqemud
systemctl start virtqemud
Try rebooting first, then close virt-manager. try the first command first then see if you can connect and load devices, if not keep reading.
Try Installing:
Also try:
systemctl start libvirtd.service
systemctl start virtlogd.service
systemctl enable libvirtd.service
systemctl enable libvirtd
systemctl daemon-reload
sudo virsh net-start default
See what's failing:
sudo systemctl status libvirtd
sudo journalctl -u libvirtd
journalctl -u libvirtd.service
READ THE LOGS!

Notes
from reddit

TODO
add guide on hiding the vm from the host, as of now just goto google and search “site:reddit.com single gpu passthrough kvm qemu gaming hide vm hidden cheat engine”
and click on the first few links.
script to reset the keyboard and mouse after vm exit, I seen another reddit post on this "this issue is gone in pure arch"